
Freezer-Friendly Breakfast Tacos
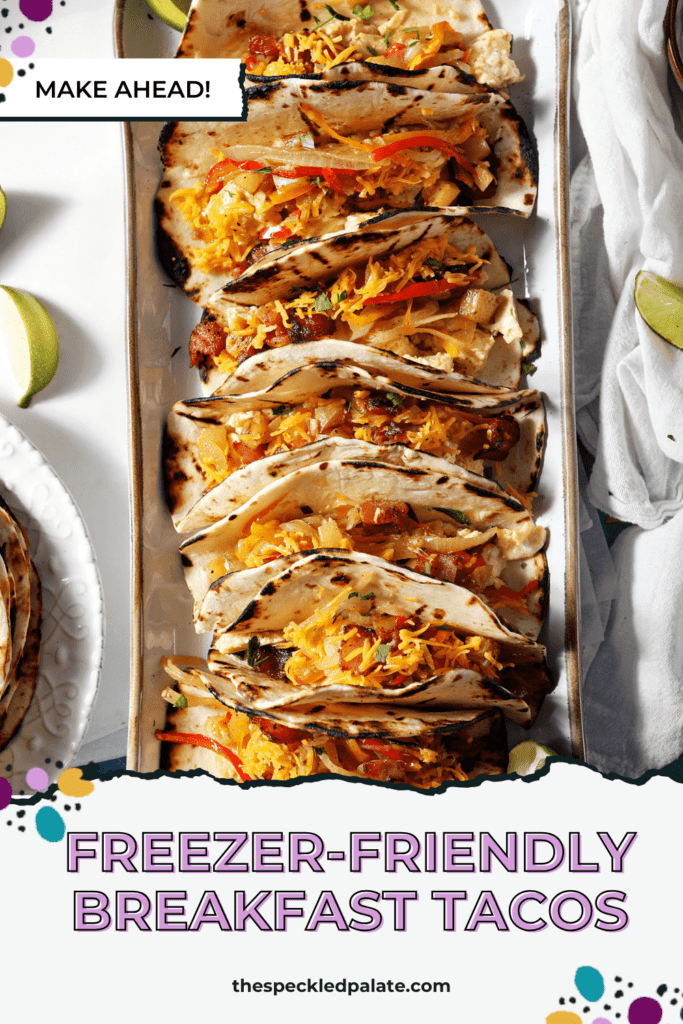
These freezer-friendly breakfast tacos are a delicious meal Easy to make ahead of time and assemble, they are delightful to start any morning. Fill these tacos with bacon, eggs and cheese — or customize them to your tastebuds.
2023 Update: This recipe was originally shared in October 2013. I have updated the recipe to include more details. The post has been updated to include new photos, as well as more tips and tricks. I hope you love them!
Frozen Breakfast Tacos Recipe
This post contains affiliate links.
If you love a taco, homemade breakfast tacos are the BEST. I don’t know about you, but I sometimes have a hankering for a breakfast taco.
This love for breakfast tacos started before we lived in Texas. Back then, we didn’t have a good place to purchase them, so I made my own.
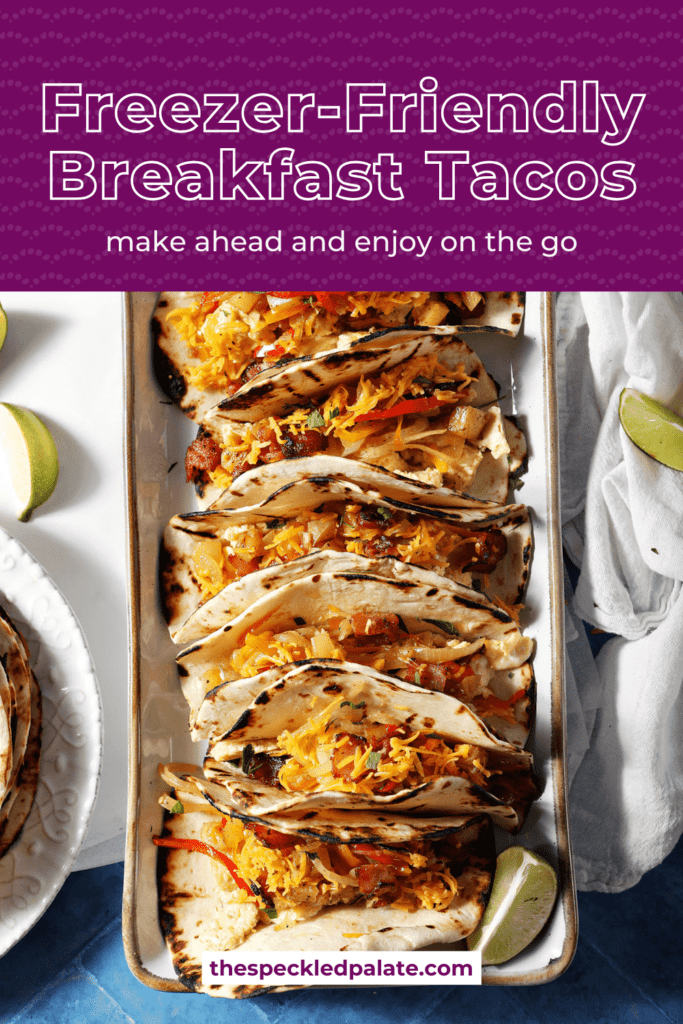
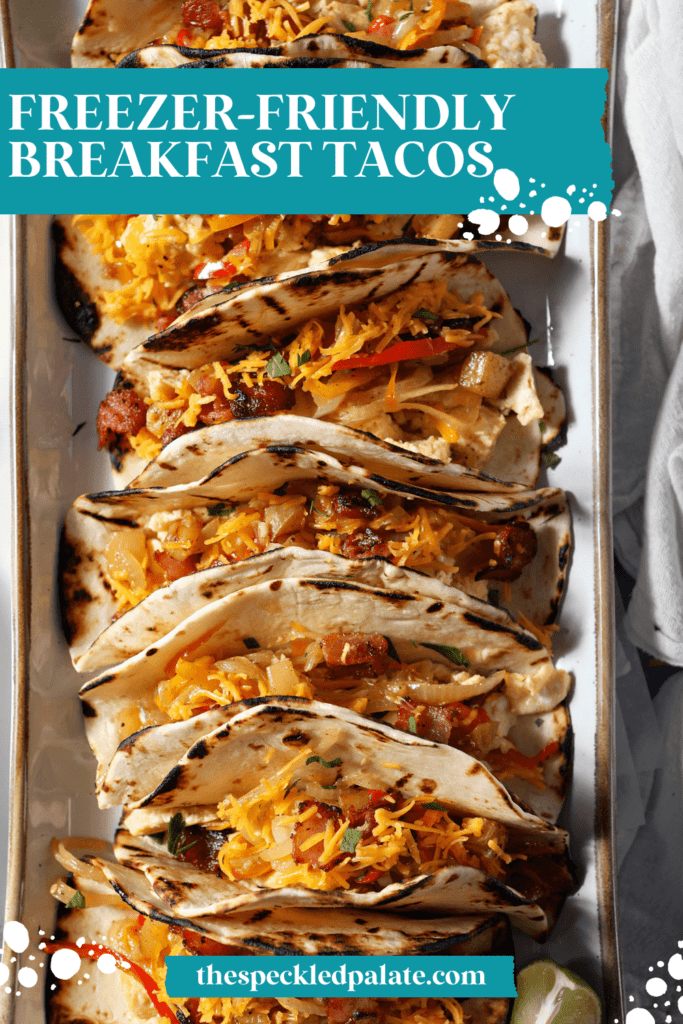
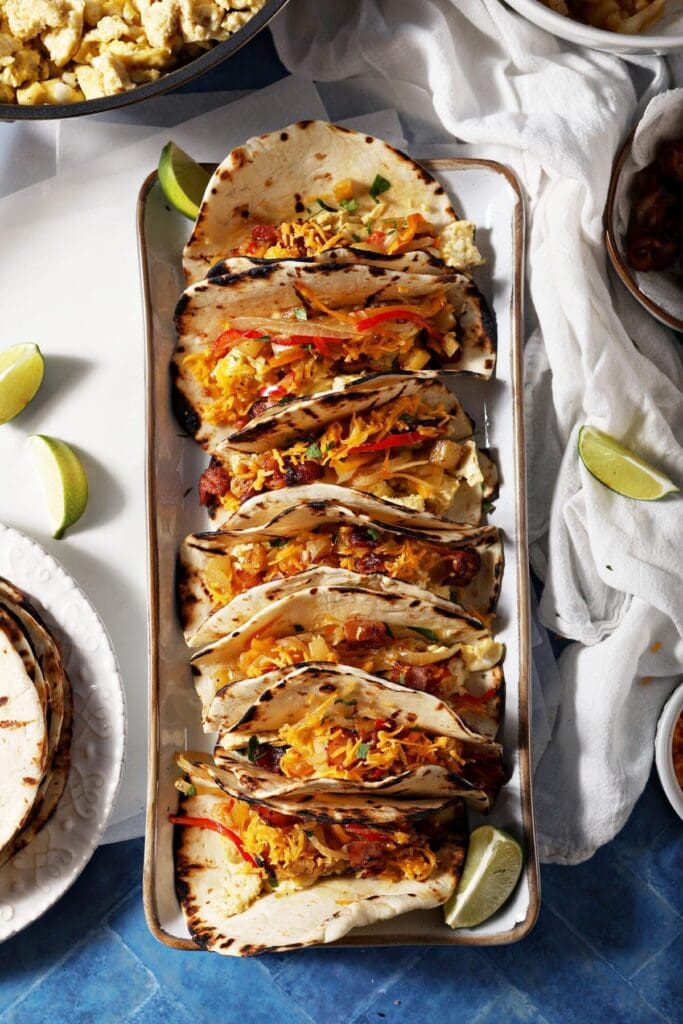
These family favorite breakfast tacos are delicious and filled with all my favorite breakfast foods: bacon, eggs, cheese, potatoes and veggies.
The beauty of this recipe is you can make them heartier (with ground pork sausage) or lighter (with plant-based meat). The recipe is easily adaptable.
These Texas breakfast tacos (or technically, Tex-Mex breakfast tacos) are a recipe my family has been making for a long time.
I’m excited to share these with you. Truth be told, I always want to have some of ‘em in our freezer. Also, they’re incredibly simple to make if you have the time.
Also, you might be able to call ’em freezer breakfast burritos since you can roll them.
I also like to keep some on hand because they are great for meal trains. You can bring them to friends going through any kind of transitional time — like grief, moving or a new baby — for some extra nourishment.
Breakfast tacos are a fun alternative to bringing lasagna and also… I really appreciated the friends and family who brought breakfast and lunch when I was postpartum. We had so many amazing dinners, but I struggled to prepare food for myself during the day, so easy-to-eat meals like breakfast tacos were a godsend.
Why I love this breakfast taco recipe:
Here are a few reasons I love these tacos…
- These are great meal prep breakfast tacos for people who have busy schedules. You just defrost them and warm them up in the morning for a filling breakfast.
- This recipe is easily customizable to different taste buds and diets. It can be doubled or tripled, too.
- They work well for picnics, the beach and tailgates. (These were inspired by a friend who was our tailgate cook in Baton Rouge.)
- Breakfast tacos are lovely for a meal train dish to bring to friends and neighbors in need of some nourishment.
On that last note: They are especially great for new parents who need some nourishment. My sister made these for me and they were a game-changer.
More breakfast recipes to try: Boudin Biscuit Breakfast Sandwiches | Bacon Egg Avocado Sandwiches | Tater Tot Breakfast Casserole
What you need to make this recipe:
The Speckled Palate participates in affiliate programs. As an Amazon Associate, I earn a commission from qualifying purchases. Please refer to my disclosure page for more information about these affiliate programs.
- Large nonstick skillet (or a cast iron skillet), for making eggs, bacon and potatoes
- Cheese grater
- Garlic mincer
- Mandoline and cut-resistant gloves
- Aluminum foil or parchment paper for wrapping the tacos
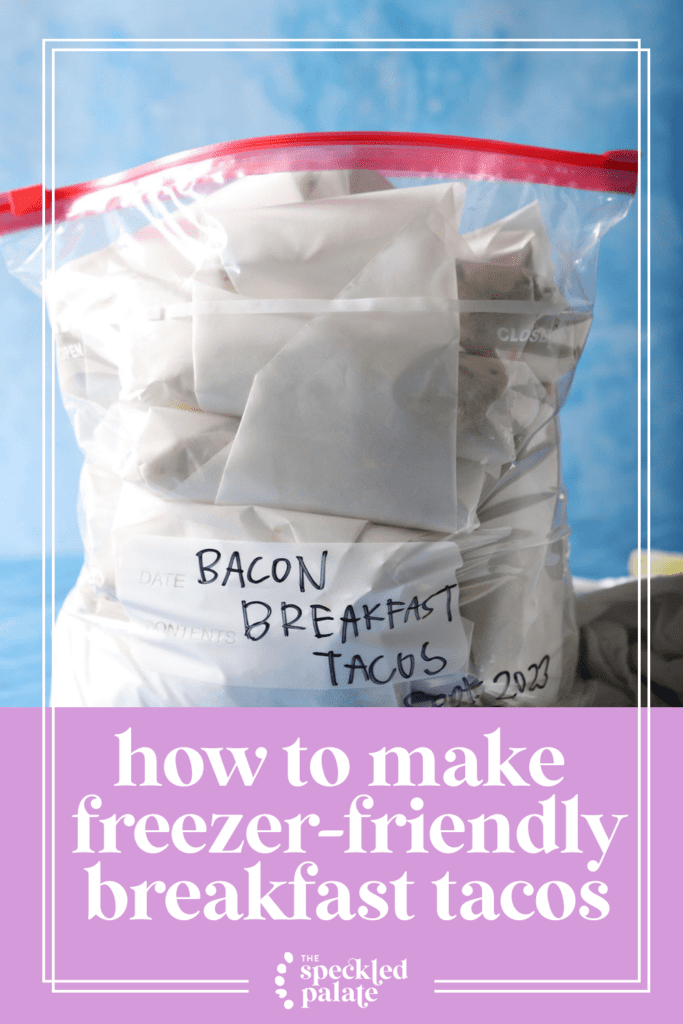
- A few big ziptop freezer bags or large food-safe, airtight containers (to store these in the freezer)
- A little bit of countertop or table space for setting up your assembly line.
Let’s talk ingredients!
In addition to the tools above, you’re going to need some ingredients to make this recipe, too! Chances are, you might already have some of them in your fridge or pantry. Scroll down to the recipe card for the full measurements and instructions.
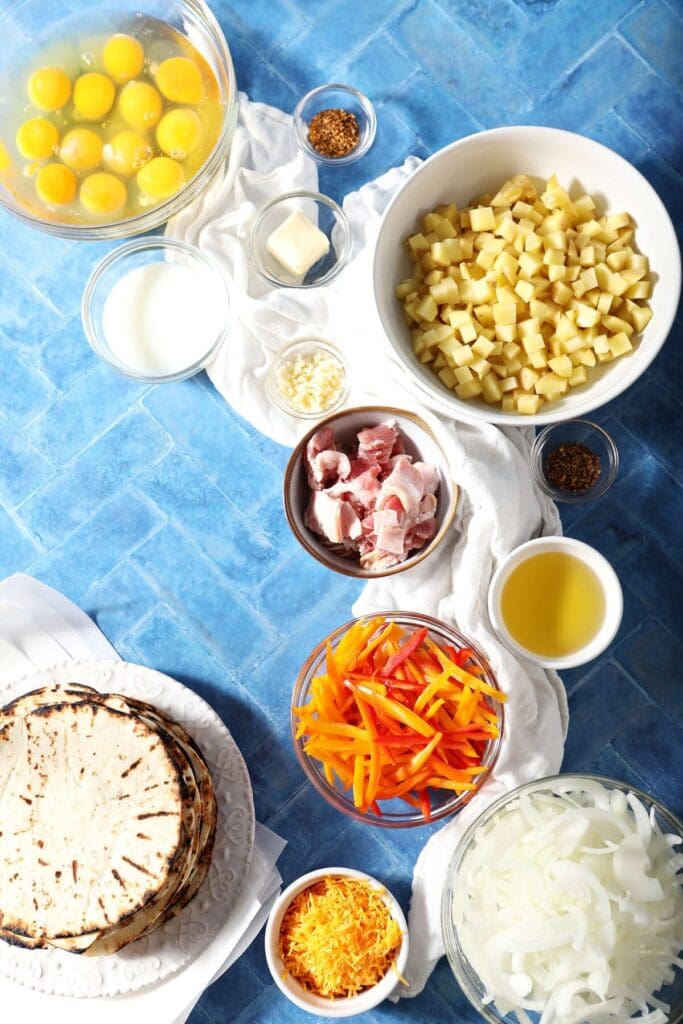
Here’s what you’ll need:
- Bacon — we like thick-cut for these, but feel free to use your favorite. Turkey bacon or vegan bacon will work here, too.
- Gold potatoes — gold is best for crispy breakfast potatoes, IMO, but any potato will work.
- Extra virgin olive oil — you can also use any neutral-tasting oil such as avocado oil or vegetable oil.
- Taco seasoning — we like to make homemade taco seasoning because it doesn’t have near as much salt and no added sugar, but you can use whatever you have on hand.
- Onions — yellow, red or white onion will all be great. Use your fave.
- Sweet peppers — any kind or color of bell pepper or other sweet pepper will work here.
- Garlic — you can use pre-minced or mince your own fresh cloves.
- Unsalted butter — salted is fine, too, but you may want to cut back on the salt.
- Eggs — use the best eggs you can afford.
- Milk — you’ll cook the eggs with a splash of milk to make them extra luscious.
- Sharp cheddar cheese — mild cheddar tends to get lost among the other flavors. You can swap this with monterey jack or pepper jack if you prefer a little spice with your breakfast tacos. You may also use more cheese than specified in this recipe.
- Warm tortillas — you can use corn or flour tortillas. Homemade tortillas are awesome, but not necessary. You can grab the fajita-sized kind from the grocery store. (Corn tortillas are gluten-free if that’s something you need!)
- Salt and pepper — kosher salt and freshly ground black pepper are my favorite, but you can use what you’ve got at home.
Customizations and substitutions
This egg taco recipe is easy to customize to your liking or dietary preferences.
You can even make a bunch of different types with different proteins or add-ins — just be sure to write with a permanent marker on the foil or bag so you can identify which is which.
Quick breakfast tacos: For a shortcut version, buy microwave bacon, frozen breakfast potatoes (or a bag of potatoes O’Brien), pre-shredded cheese, store-bought taco seasoning and tortillas. All you’ll need to prepare is warming up the frozen stuff and cooking the scrambled eggs, which won’t take long!
Sausage breakfast tacos: Make these tacos with breakfast sausage (pork or chicken are both great) instead of bacon. We also like making breakfast tacos with chorizo.
Spicy breakfast tacos: Add a pinch of cayenne pepper to your potatoes to give them some extra spice. Use pepper jack cheese. Then, serve them with your favorite hot sauce or spicy salsa for dipping. Do all of these or just one or two, depending on how spicy you like your breakfast tacos!
Vegetarian breakfast tacos: Skip the bacon altogether or use a plant-based substitute like vegan bacon or vegan sausage crumbles. You could also add vegetarian refried beans or black beans for extra protein!
Vegan breakfast tacos: Use these ingredients to make a vegan version:
- plant-based bacon or sausage
- egg replacer for scrambled eggs
- dairy-free milk
- vegan shredded cheese
- plant-based butter
- vegan tortillas (Most flour and corn tortillas are vegan, but be sure to check the packaging.)
Gluten-free breakfast tacos: Use corn tortillas or gluten-free flour tortillas. Always read the packaging.
Dairy-free breakfast tacos: Use vegan cheese and skip them milk when making the scrambled eggs. Most flour and corn tortillas are not made with butter, but be sure to check the packaging to be sure.
How to make Breakfast Tacos
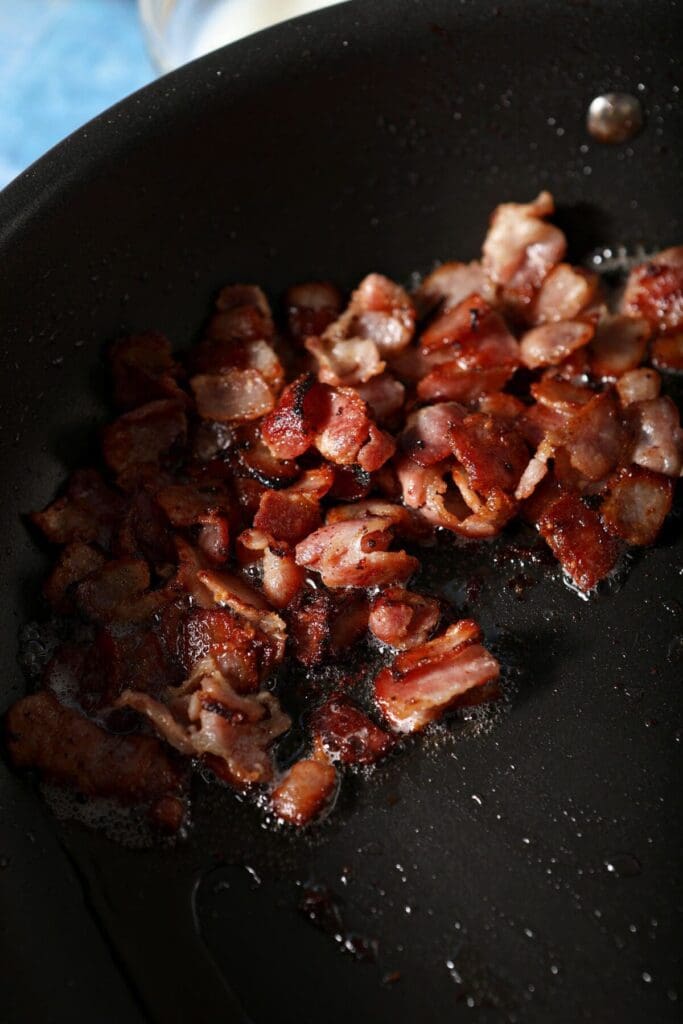
First, you’ll need to fry up some bacon in a large skillet or cook bacon in the oven. If you’re making sausage or any other kind of meat add-in, cook that first, too.
Next, heat the olive oil over medium-high heat in the same skillet. (You can leave the bacon grease for extra flavor.)
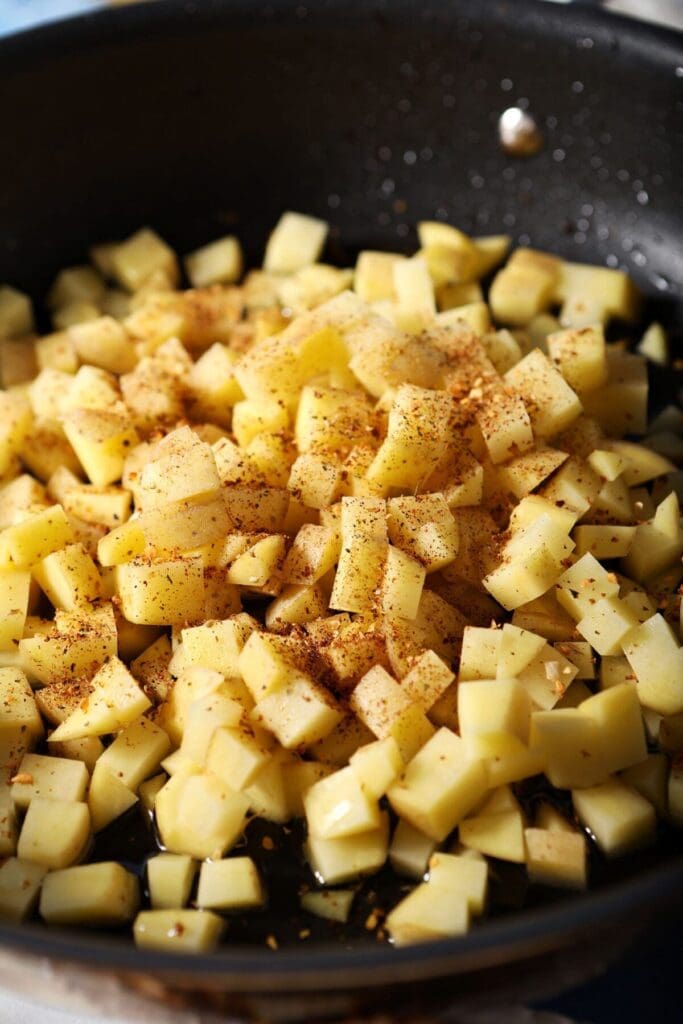
Add the potatoes and some of the taco seasoning.
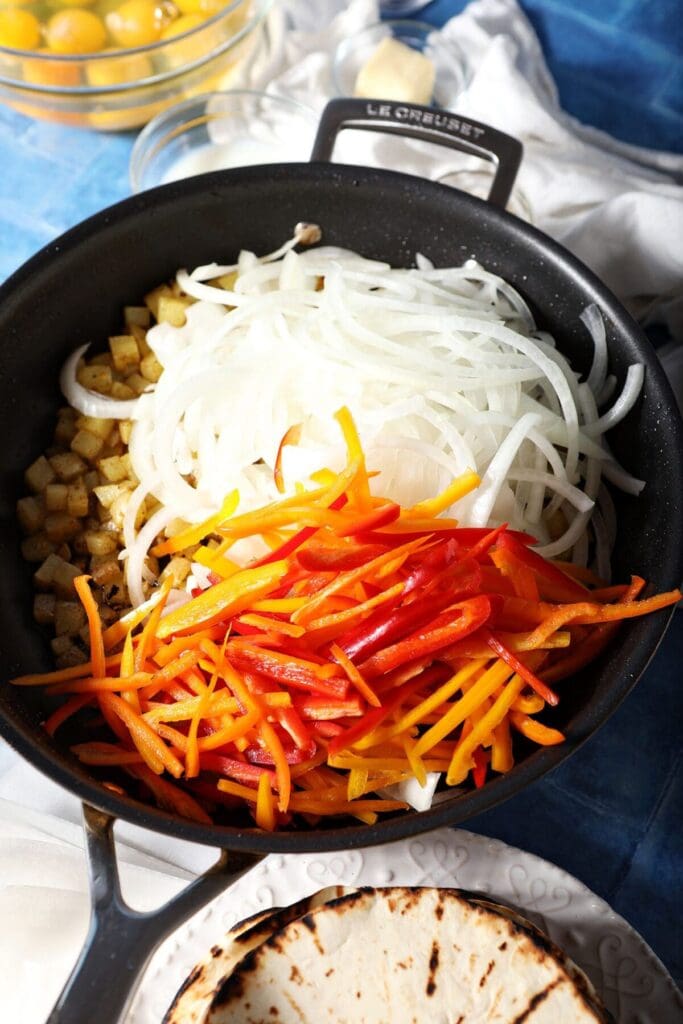
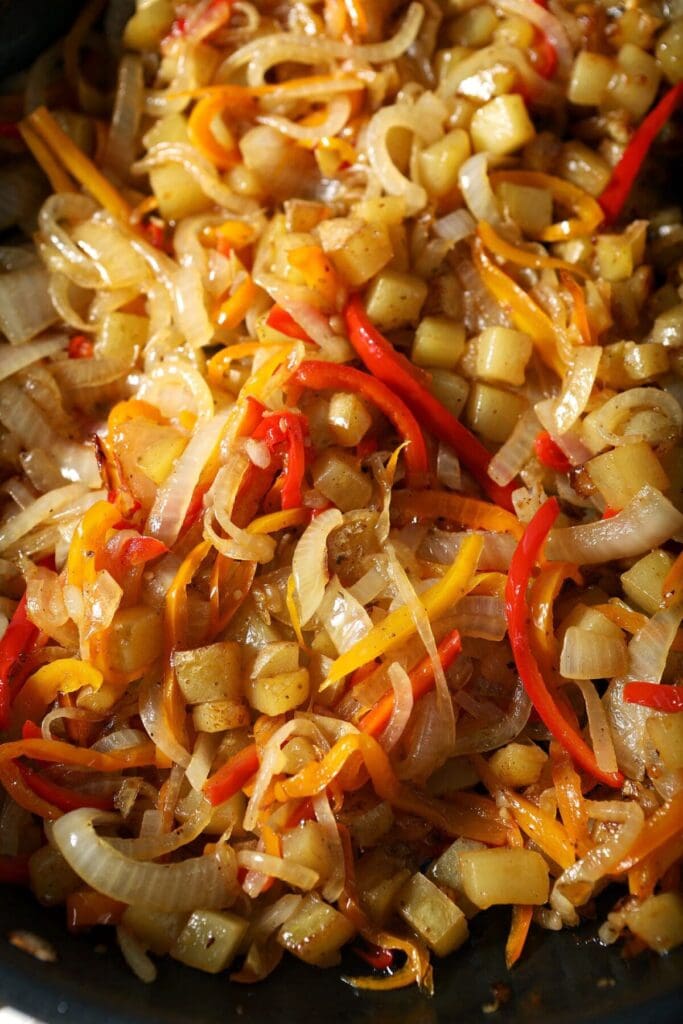
When the potatoes are soft, add in the onions and sweet peppers, cooking until soft. Add the garlic and cook until fragrant.
Remove from the pan once cooked with a slotted spoon and set aside in a bowl for assembling the tacos later.
In the same pan, add the butter and lower the heat to medium-low heat.
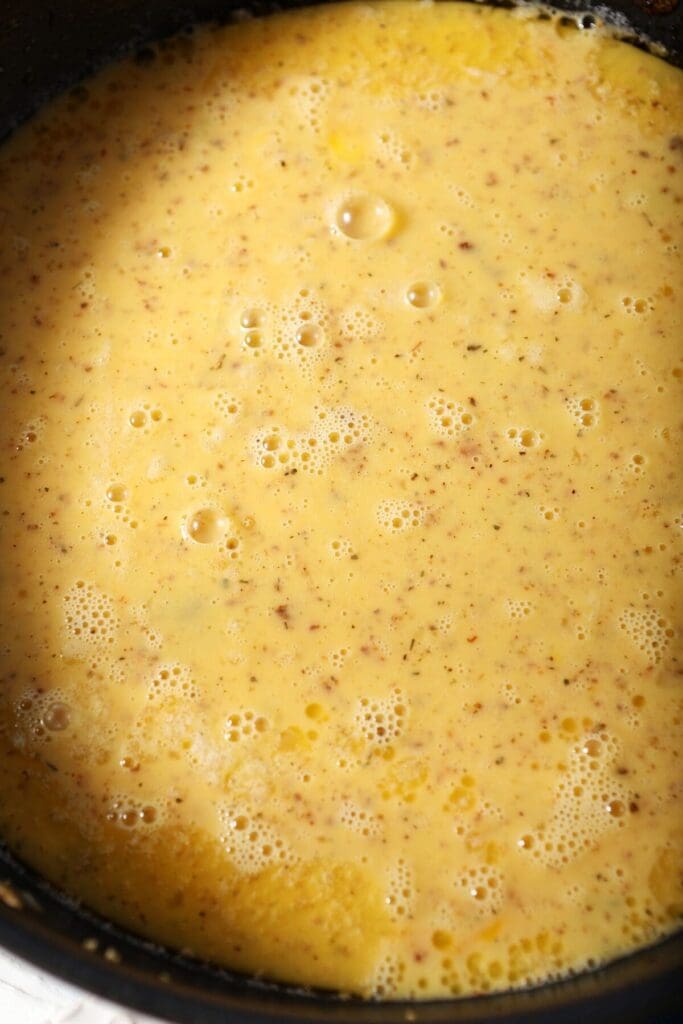
Break the eggs into a bowl. Whisk in the additional milk and the remaining taco seasoning. Whisk together.
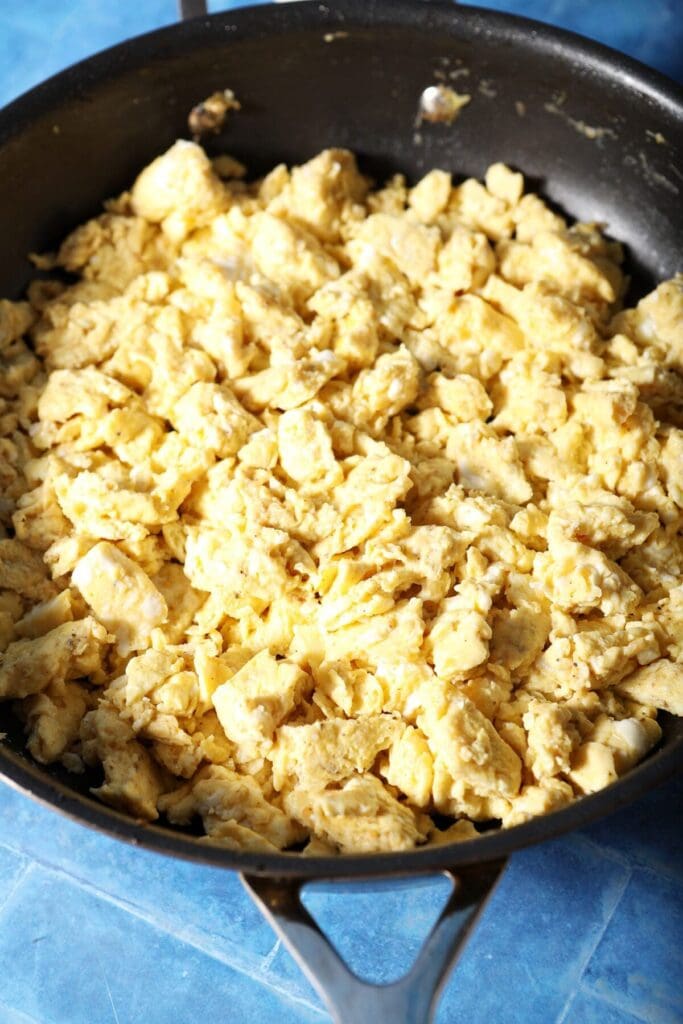
Add the egg mixture to the pan and slowly scramble the eggs using a rubber spatula to move them around the heavy skillet.
Once scrambled to your liking, transfer to a bowl and set aside.
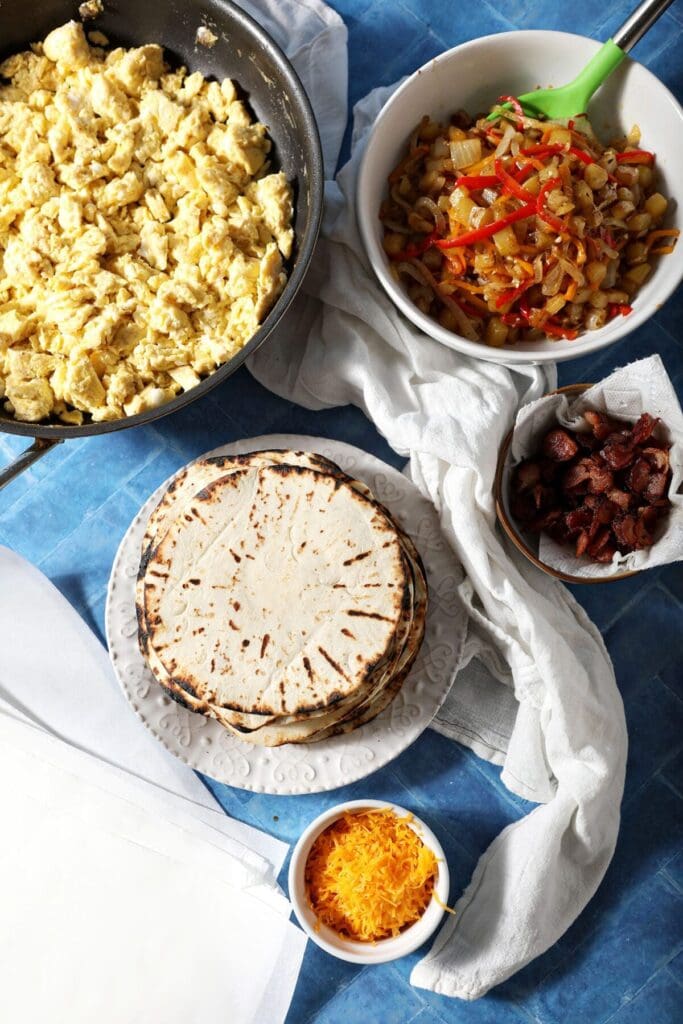
Then, warm up the tortillas and place the grated cheese in a bowl.
How to assemble breakfast tacos
Now, it’s time to make the tacos! It’s easiest to set up everything in bowls and make an assembly line. Get the whole family involved if you want!
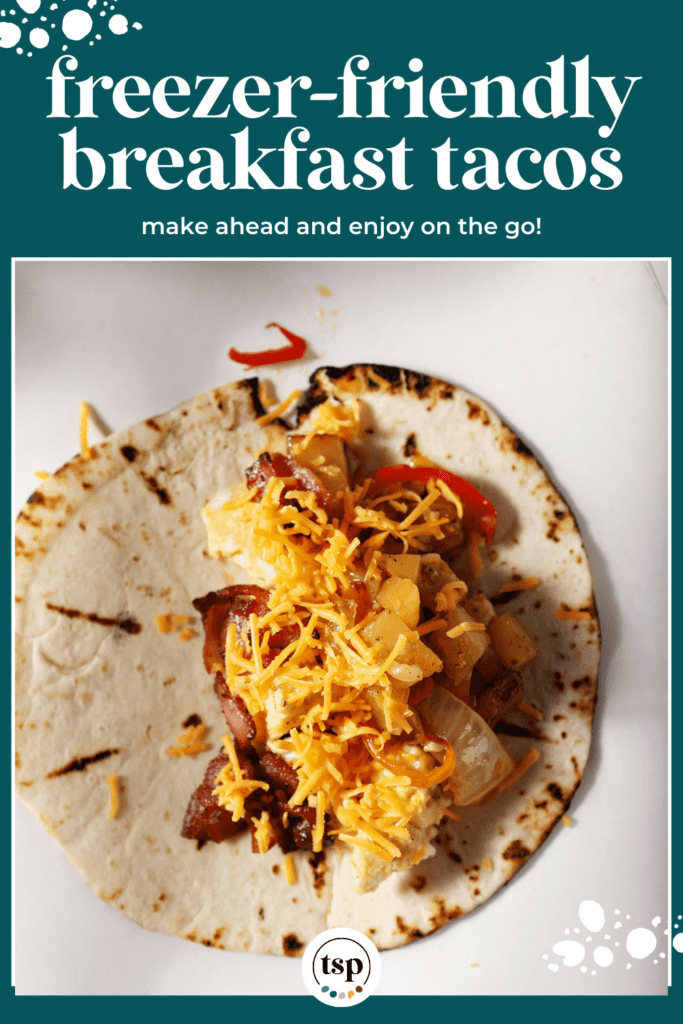
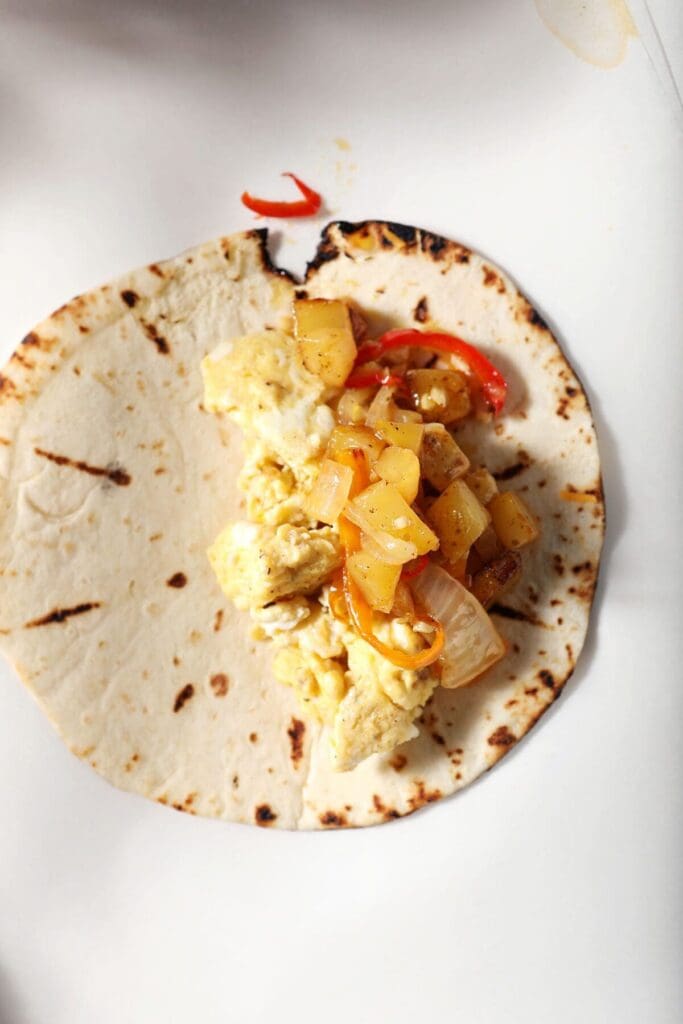
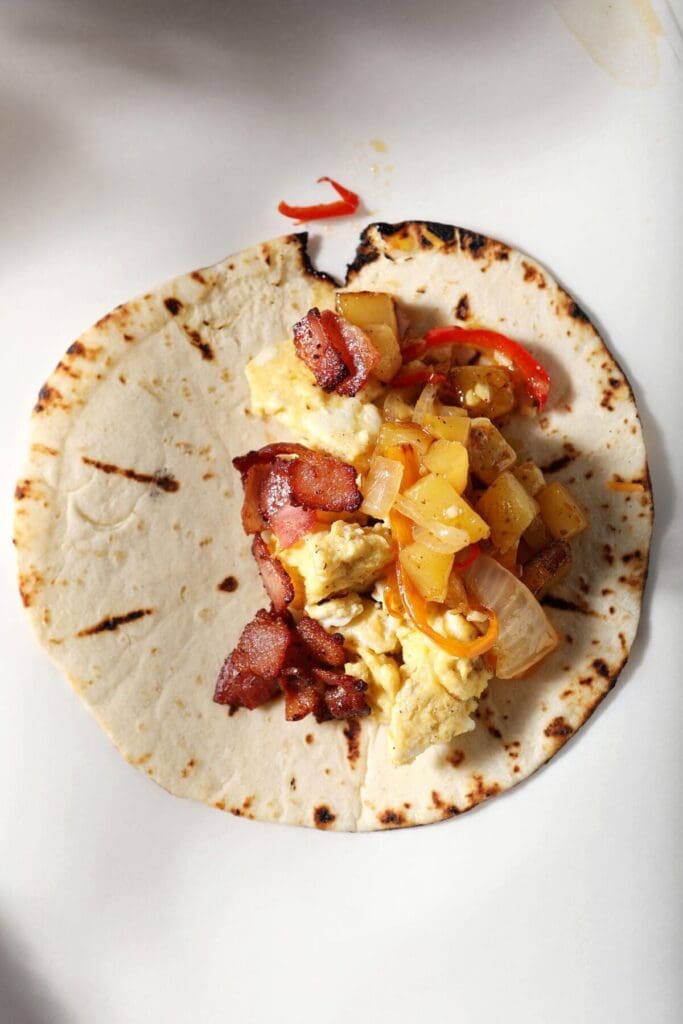
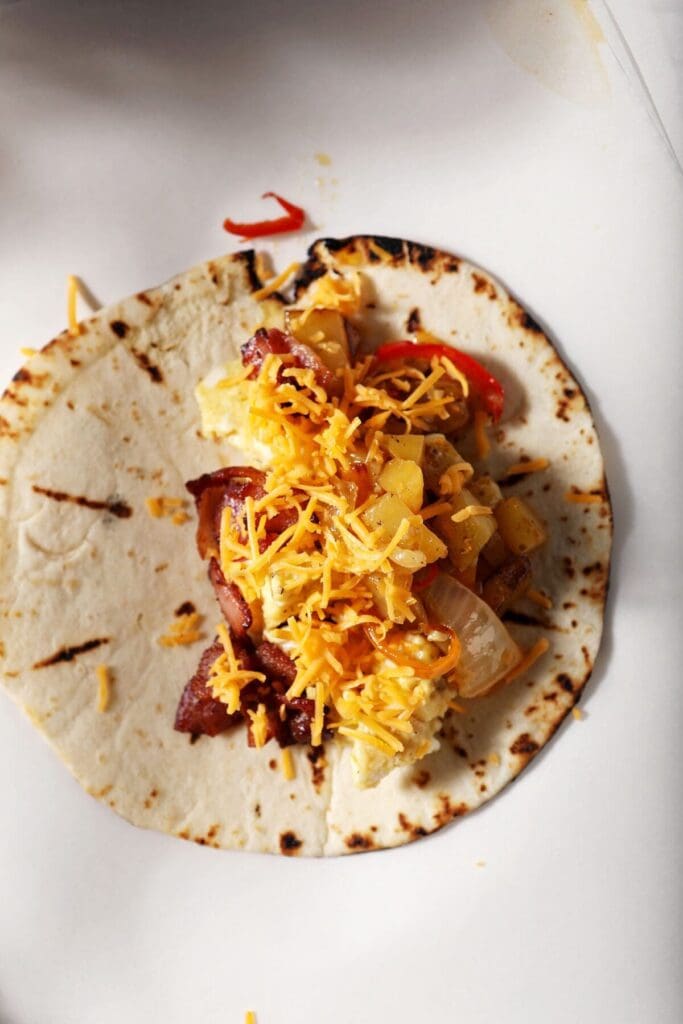
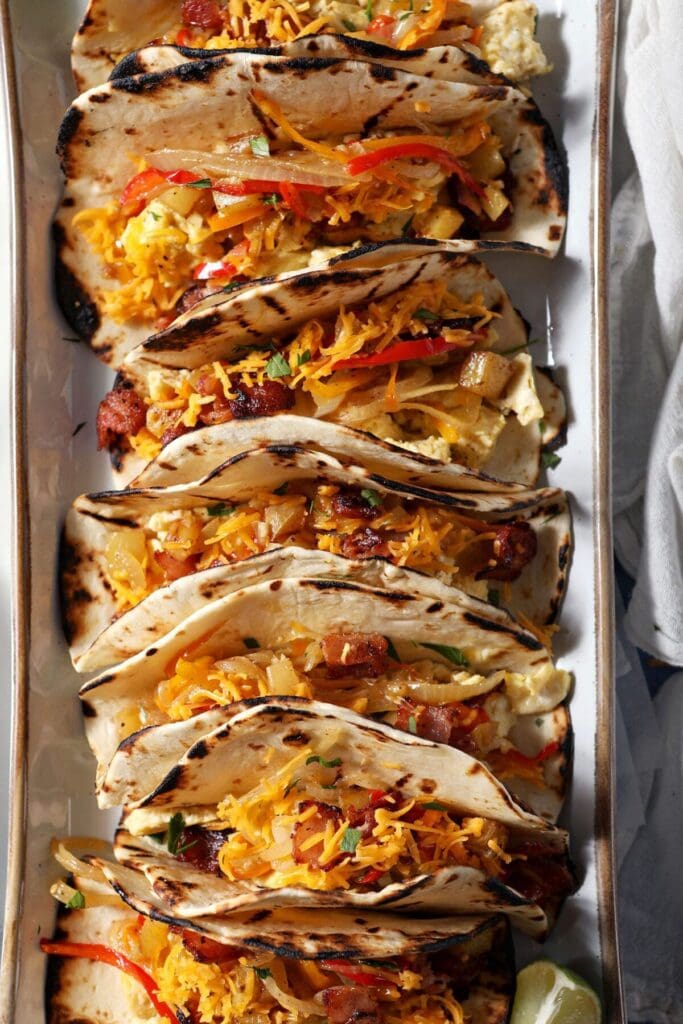
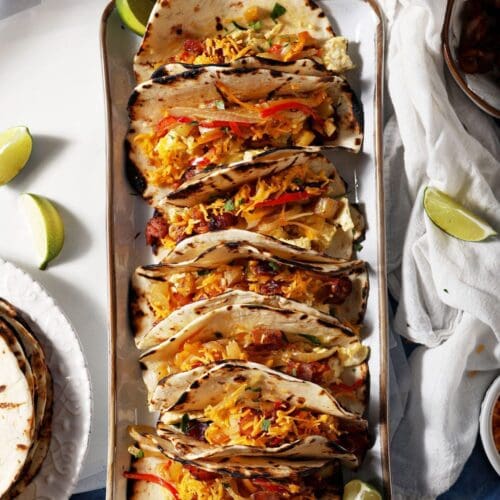
- Grab a warmed tortilla.
- Add the crispy bacon.
- Top with potatoes.
- Spoon scrambled eggs over top.
- Top with a little sprinkling of shredded cheese.
- Wrap the tacos in aluminum foil or parchment paper to freeze — or consume a few immediately!
You can serve them with your favorite dippers, like sour cream or salsa.
How to store
You can enjoy your breakfast tacos right away if you like! But they are also delicious later.
In the refrigerator: Wrap the tacos in foil and store them in the fridge. Reheat in the microwave (without the foil) or in the oven or toaster oven (with foil) when you’re ready to eat them. Enjoy within five days.
In the freezer: These last for three months in the fridge — if you can make them last that long! Defrost them in the fridge overnight, then warm up in the foil in the oven or toaster oven, or in the microwave (no foil please!).
You can also heat them from frozen on a baking sheet, but they can take about 30 minutes in a pre-heated 350°F (177°C) oven.

Erin’s Easy Entertaining Tips
This recipe was first made to celebrate FOOTBALL season and game day eats. Breakfast tacos are easy to carry around while tailgating and delicious to eat while enjoying a homegate.
Here are some ways you can entertain with these beauties:
- Make a big batch of these to bring to a friend as part of a meal train.
- Keep a stash in the freezer for weekend houseguests.
- If not freezing these, serve them with lots of toppings like different types of cheese (like queso fresco), salsa, pico de gallo, salsa verde, guacamole and fresh cilantro or green onions.
- Make these over a propane skillet at a tailgate. Or warm them before leaving the house and tote them in a warming bag to a morning picnic or a sunrise gazing at the beach.

Frequently Asked Questions
Yes. Once you have filled the tortilla with your favorite breakfast foods, you can fold them and wrap in foil. Place the tacos in a freezer-safe zip-top bag and freeze for up to three months. Defrost in the fridge overnight and warm in the oven or microwave when ready to eat.
Quick tips and tricks to making the best Breakfast Tacos
- Warming the tortillas helps them to bend and fold easier than if they are cold or room temperature.
- Set up an assembly line so you can quickly put together the tacos with ease.
- If you make different versions, say a mix of bacon, sausage and vegetarian, be sure to label them so you can identify the right kind later.
More breakfast recipes
- Andouille Sausage Breakfast Tacos
- Croissant Breakfast Sandwich
- Make-ahead Breakfast Burritos
- Green Chile Egg Casserole
Here’s how you can make them:
Freezer-Friendly Breakfast Tacos
Ingredients
- ½ lb. bacon chopped
- 2 ½ cups diced gold potatoes 3 potatoes, diced in ½” cubes, about 1 lb.
- 5 tablespoons extra virgin olive oil
- 2 teaspoons taco seasoning divided
- 3 cups thinly sliced yellow onion 1 large onion, about 12 oz.
- 1 ½ cups thinly sliced sweet peppers 6 peppers, about 5.5 oz.
- 2 cloves garlic minced
- 2 tablespoons unsalted butter
- 12 eggs
- 4 tablespoons milk
- ½ cup finely shredded sharp cheddar cheese 1.75 oz.
- 20 tortillas corn or flour OK, warmed
Equipment
As an Amazon Associate and member of other affiliate programs, I earn from qualifying purchases.
Instructions
- Cook the chopped bacon in a nonstick skillet on the stovetop. (You may also bake the bacon in strips, then crumble it up.) Once crispy, remove from the pan and place on a paper towel to drain.
- In the same pan, heat the olive oil with the leftover bacon grease.
- Add in the potatoes and 1 teaspoon of the taco seasoning to the pan. Season with a large pinch of salt, too.
- When the potatoes are soft, about 5-7 minutes, add the onions and sweet peppers. Cook until soft, about 4-5 minutes. Add the garlic and cook until fragrant, about 1 minute. Remove everything from the pan.
- Add the butter to the same pan. Lower the heat to medium-low.
- Crack the eggs into a large bowl. Add the milk and the additional 1 teaspoon of taco seasoning. Whisk together until combined.
- Pour the egg mixture into the pan. Slowly scramble the eggs.
- Once the eggs have been scrambled to your liking, remove the pan from the heat and remove the eggs from the pan.
- Now, it's time to make the tacos: Layer the ingredients into each warmed tortilla, top with a little sprinkling of cheese.
- Wrap the tacos in aluminum foil or parchment paper for freezing or consume immediately.
Nutrition

About the Author:
Erin Parker is a Southern gal living in Texas with her husband and two daughters. She started The Speckled Palate to share what she was cooking as a newlywed… and over the years, it’s evolved to capture her love for hosting. Specifically, the EASIEST, lowest key entertaining because everyone deserves to see their people and connect over good food. Learn more about her…


Erin, these really do sound soooo good! I don’t tailgate much, but we go camping frequently…perfect for that, too! Thanks for sharing a great idea and recipe! 🙂
Love, Joy
Yesterfood
Joy, I think these tacos would be awesome for camping, too! If y’all try them out, I’d love to know what you think!
This looks delicious we don’t camp but I love things that I can freeze and do a quick meal especially in the mornings.
Quick morning meals are the best, Kita. And we are the same way… absolutely no camping for us, but since we love football, we find ourselves at various tailgate parties throughout the fall.
Oh man, that looks good, but then again, it has bacon so that always makes it good. 🙂
You DO have a point there, Dawn. Bacon is pretty delightful…
This is an amazing idea. I love that you can save them for later!
Thanks, Krystal! They’re great reheated, too. We actually had a few for breakfast on Saturday this weekend.
Ohh Erin, you are speaking my language with these.
Thanks, Aleshea! Let me know if you give these a shot. 🙂
What would you recommend for microwave options? Butcher paper? I’d like to make these for my husband’s breakfast to take to work in his lunchbox.
Hi Shelley! We’ve simply removed the tacos from their aluminum foil packaging and heat on a plate in the microwave! Butcher paper would work, too, though I don’t know how well that would do in the freezer. If you give it a try, please let me know!
How long in microwave (if they’ve been frozen)
Hi Liz! Be sure to unwrap them from the foil before putting them in the microwave. (I say this because I didn’t tell my husband one time and, well…) I normally start off with 2 minutes and will check after that amount of time to see how they feel. Heat them in 30 second increments until heated to your desired temperature.