
Homemade Loaded Queso
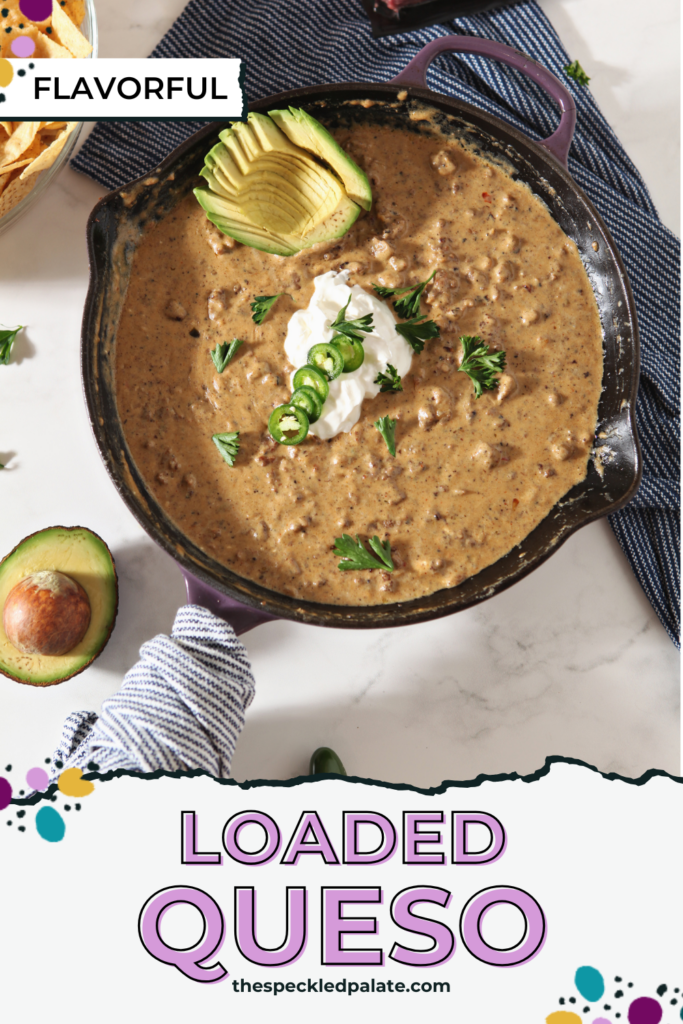
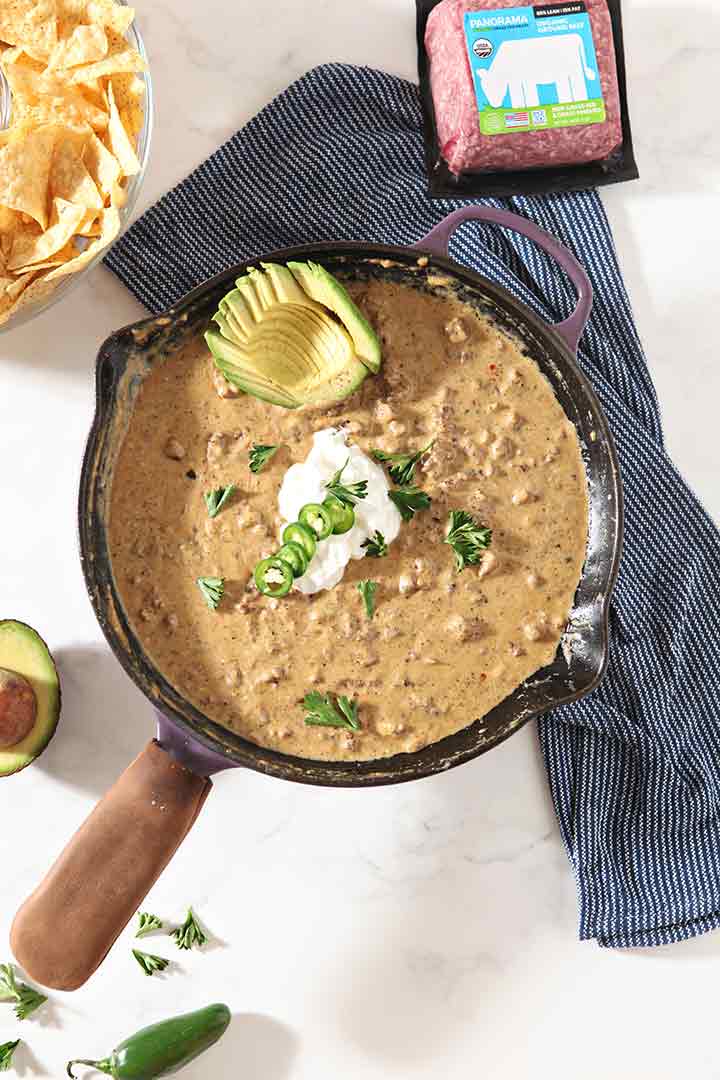
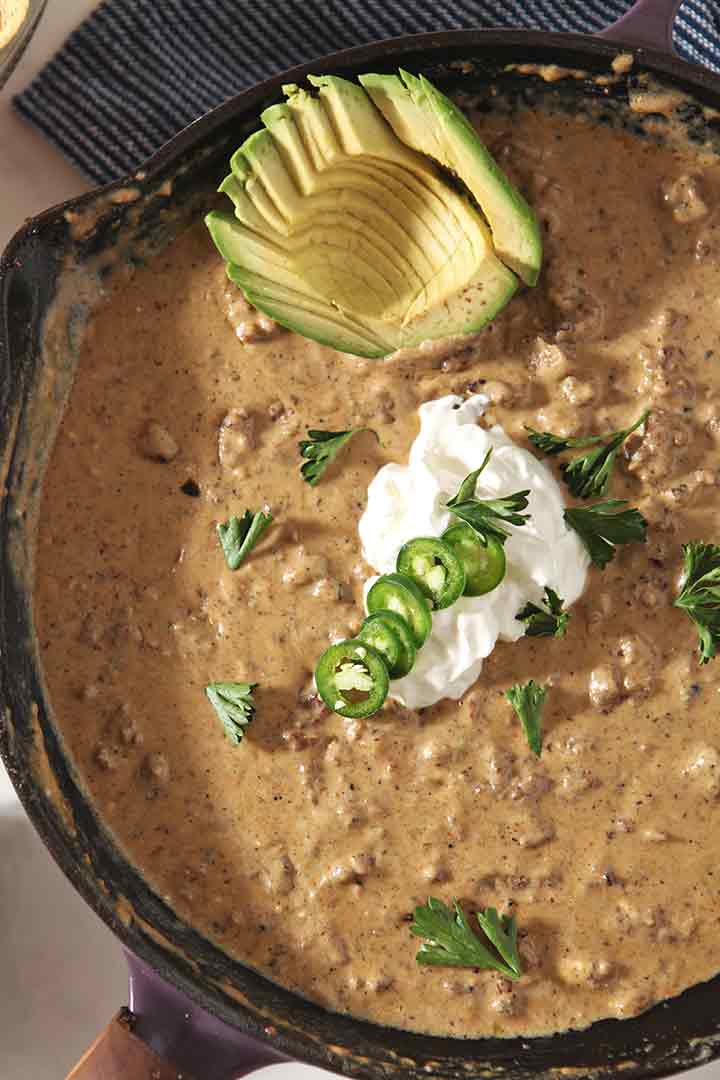
Loaded Queso is the perfect appetizer for any occasion. Studded with ground beef and garnished with avocado, sour cream and jalapeño rounds, this homemade queso blanco is a restaurant-quality dish that’s easy to make at home. No shelf-stable cheese or canned milk necessary. Makes 12 servings.
Want to save this?
This post was originally created for and sponsored by Panorama Meats. This brand’s products are no longer available for purchase.
Queso is sooooooo good, y’all.
Please note that we call it queso, not cheese dip or cheesy dip, my friends.
But I’ve learned through years of trying queso at every TexMex and Mexican restaurant we visit in Texas that there are levels of queso.
There’s the homemade stuff we’ve all had that calls for a classic shelf-stable, super processed cheese. It tastes awesome, but then it congeals as it cools, and I get the heebie jeebies from the consistency of it.
There’s the stuff from your favorite TexMex or Mexican restaurant that’s served with bottomless chips, and it’s magical… but realistically, you can’t run out to the restaurant whenever you have a queso craving, right?
And then there’s the real deal homemade stuff that can feed a crowd while also being delightfully flavorful with a perfect smooth consistency.
It’s a unicorn queso… but I unlocked that magic with this LOADED QUESO.
Why I love this recipe:
Calling for ground beef, three different kinds of cheese and a handful of other ingredients, I’ve perfected my favorite game day recipe… and it’s something you can make at home, too.
This Skillet Queso Dip is technically a chili con queso recipe. It’s a crowd pleaser and favorite appetizer for good reason.
it’s got a ton of ground meat in it, plus the best kind of melty cheese. BUT THEN, to make it even more decadent, it’s finished with sliced avocado, creamy sour cream and jalapeno.
This is a bean-less chili (so you won’t see any refried beans OR canned beans in it), and it’s made completely from scratch with ingredients that mostly come from the refrigerated section of the store.
It’s kind of like the Rotel Sausage Dip we all know and love, but with beef. It has similar vibes to this Taco Dip, too.
So whether you’re hosting friends for the big game, having a dinner party and need a dip to get the party started, are hosting a movie night or just find yourself craving homemade queso that’s the real thing, this recipe is for you!
More of our favorite dips to make and share: Black Bean Dip / Caramelized Onion Guacamole / Roasted Garlic and White Bean Hummus / Raspberry Yogurt Fruit Dip
What you need to make this recipe:
The Speckled Palate participates in affiliate programs. As an Amazon Associate, I earn a commission from qualifying purchases. Please refer to my disclosure page for more information about these affiliate programs.
- Sharp knife and cutting board
- Box grater
- Cast iron skillet or large nonstick skillet
- Wooden spoon
- Liquid measuring cup
Let’s talk ingredients!
In addition to the tools above, you’re going to need some ingredients to make this recipe, too! Chances are, you might already have some of them in your fridge or pantry. Scroll down to the recipe card for the full measurements and instructions.
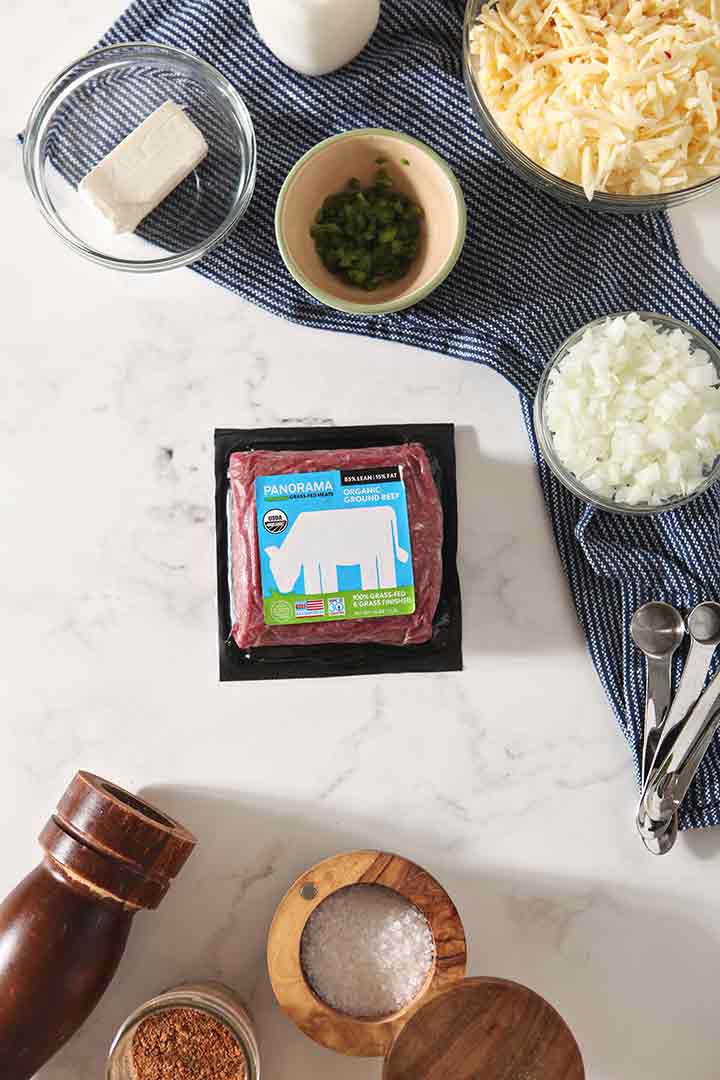
Here are the simple ingredients that you need to get at the grocery store:
- Avocado oil or another unflavored oil — this is what we cook the veggies and meat in. Use whatever you like to cook with.
- Onion — yellow or white onion is what you want for this recipe. You’ll need a small one.
- Jalapeño pepper — half of this goes into the skillet and the other half can be used as a garnish.
- Ground beef — I use 85/15% in this recipe, but you could use a leaner variety, if you prefer. You might need to add more oil to the skillet if you have leaner meat.
- Seasonings — this recipe calls for a mix of taco seasoning (homemade or store-bought), kosher salt and freshly cracked black pepper.
- Milk — this will thin out the dip and give us that consistency that we want without making it too runny
- Cheeses — we use THREE kids of cheeses in this queso! Cream cheese gives us that luxurious texture (without Velveeta cheese), and we add flavor and meltiness with a combination of white cheddar cheese and hot pepper jack cheese. You could use your favorite yellow sharp cheddar cheese, if you prefer, to the white cheddar.
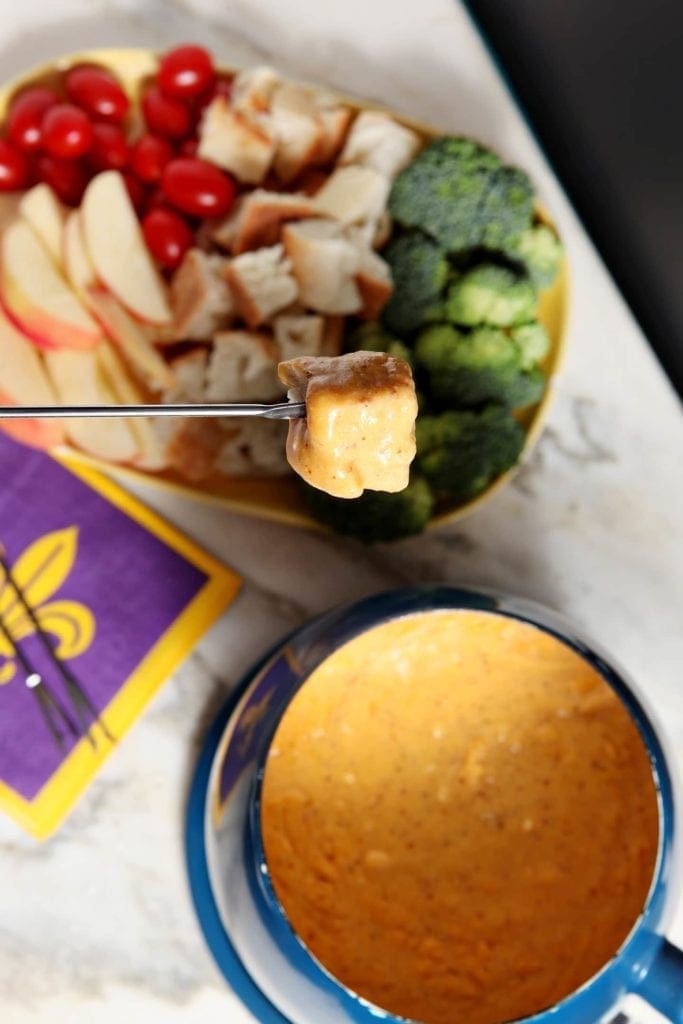
- Garnishes — these include sliced avocado, a big ‘ol dollop of sour cream and additional jalapeno.
- Chopped herbs — I used chopped parsley because cilantro tastes like soap to me, but I know cilantro would make a great garnish IF it tastes good to you. Green onions would also be great as a garnish.
- Tortilla chips — for dipping, obvs.
How to make Loaded Queso
Prep the ingredients
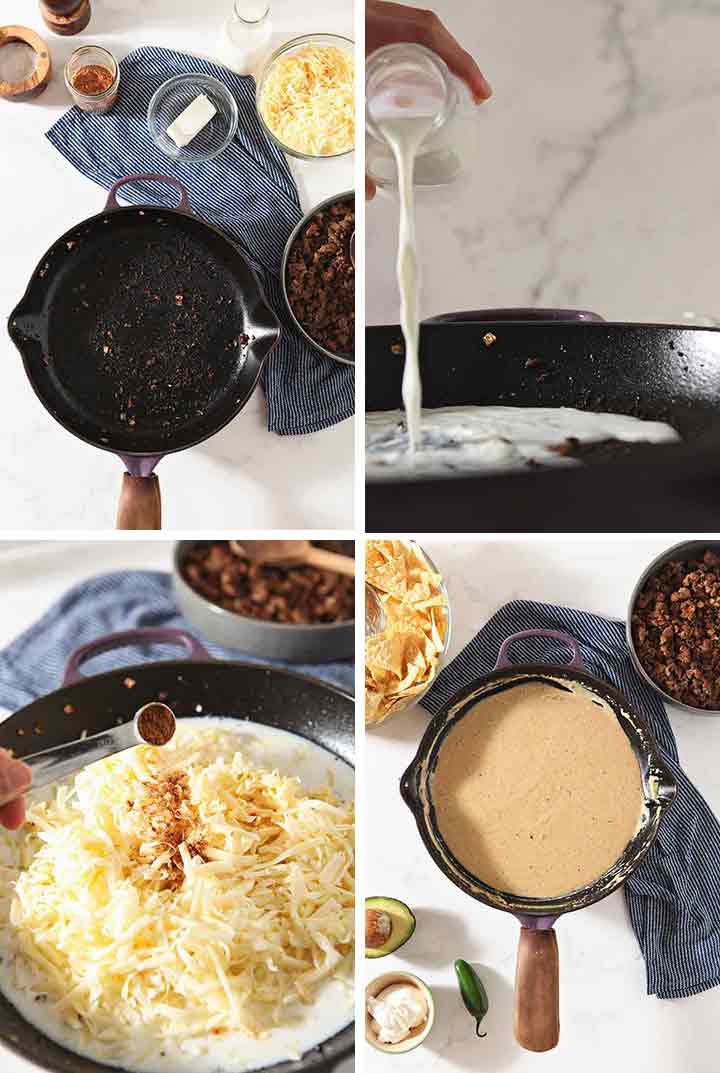
Mise en place. Dice the onion and pepper. Shred the cheeses. Let the cream cheese come to temperature. This will help it melt faster, which means your queso will be ready faster!
Pour the milk into a liquid measuring cup, as well.
Measure out the spices, and prep the garnishes, too.

Cook the veggies, and brown the meat
For this recipe, you need a large skillet. I’ve made this in the 12” trusty skillet that I inherited from my grandmother. It’s about 2” deep (seen here in the photos) and an 8” round, one that is about 4” deep (seen in the video for this recipe.) You can use a nonstick skillet or even a saucepan if you only have smaller skillets.
Heat the skillet over medium heat, and add the oil. Once that’s hot, add the diced onion and jalapeño pepper.
You’ll move the onion and jalapeño around the skillet with a wooden spoon (or another cooking utensil of your choice) and cook until they’ve softened. They’ll become translucent, and that’s how you’ll know they’re about ready.
I always cook mine a little too long because I like ‘em to have a little bit of color on them.
Once the onion and jalapeño are softened, add the pound of ground beef, and season it immediately with taco seasoning, salt and pepper.
Use your wooden spoon (or cooking utensil of choice) to break up the beef so it can cook more evenly. Then cook until browned, crumbly and delicious.
How to brown ground beef
Browning is the process of cooking the surface of meat. It can also be used to cook meat all the way through, as we do in this Loaded Queso recipe.
The browning process gives the beef a brown color (hooray!), and it adds flavor. It also pulls out excess fats from the meat.
The longer the beef cooks, the browner (and more cooked through) it becomes.
So to brown ground beef, you throw it in a pan with a little oil, break it up with a wooden spoon (or another kitchen tool), season it and cook it over medium-high heat until it turns brown.
Once the meat is browned, transfer it from the skillet to a large bowl, and set aside.
Make the queso
We’re going to melt that cheesy goodness next! And we’re going to use the same skillet, though we’re going to turn down the heat so we don’t scald anything.
Once the heat is low, add the milk and the cream cheese. You want them to warm up, together so the cream cheese will melt into the milk.
CREAM CHEESE TIP!
Room temperature cream cheese will melt faster than the kind that’s straight out of the fridge. This part takes me the longest every time I make this queso—the cream cheese can take up to 10-15 minutes to melt!
Once the cream cheese begins melting, add the other cheeses and additional taco seasoning.
Give ‘em lots of stirs until the cheeses have completely melted.
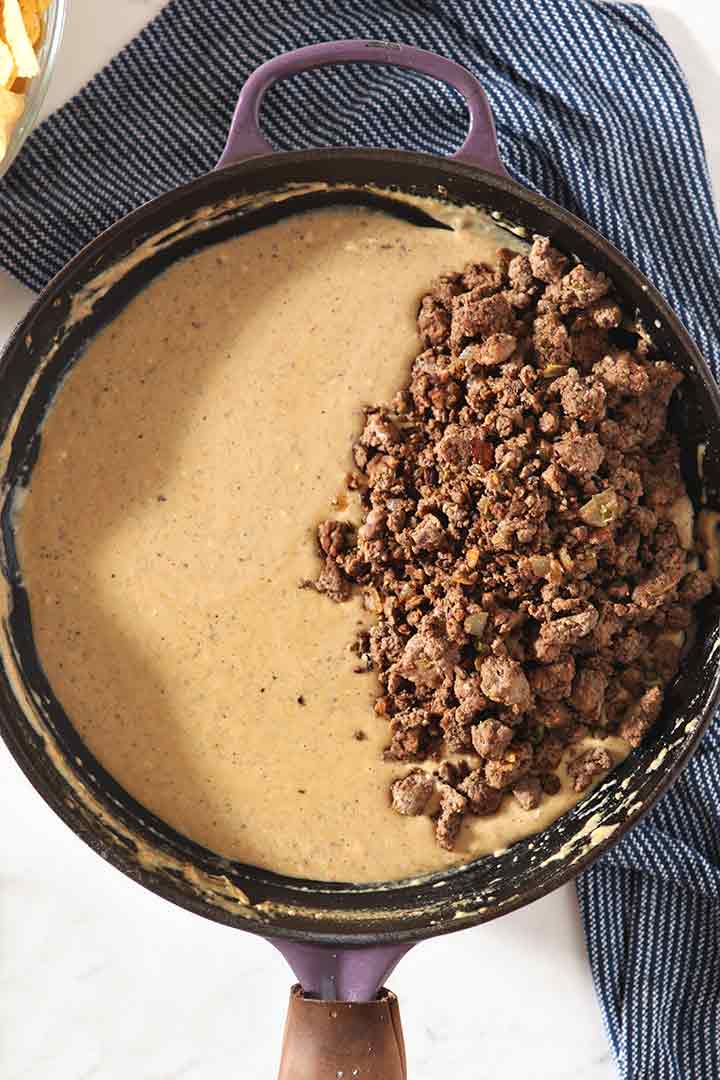
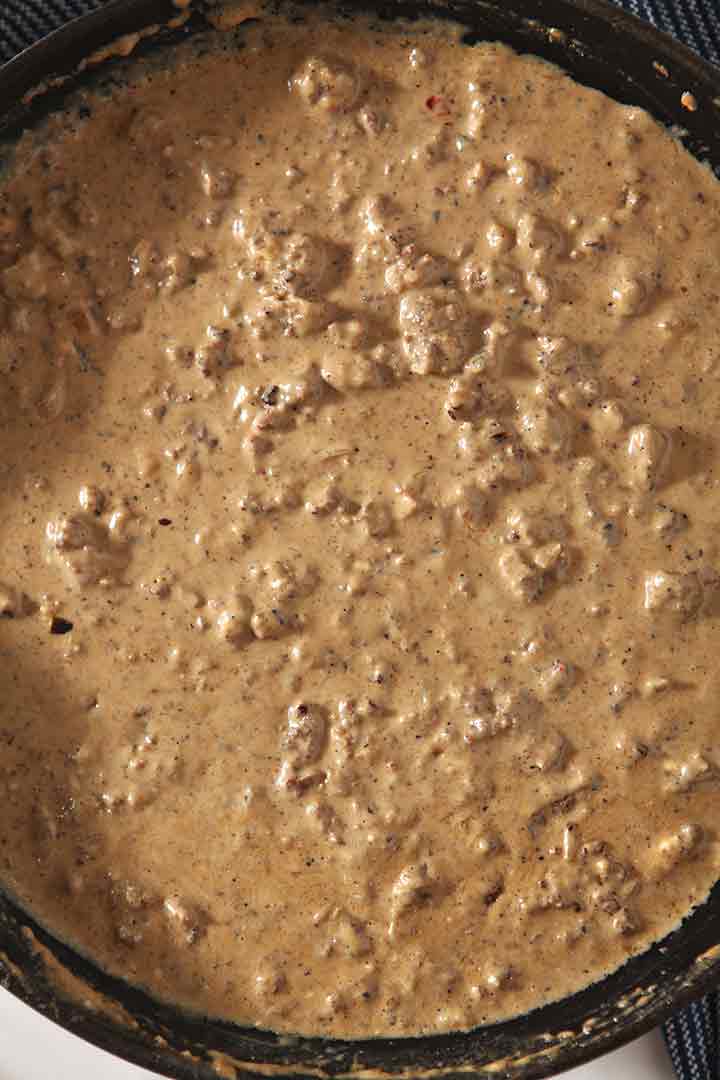
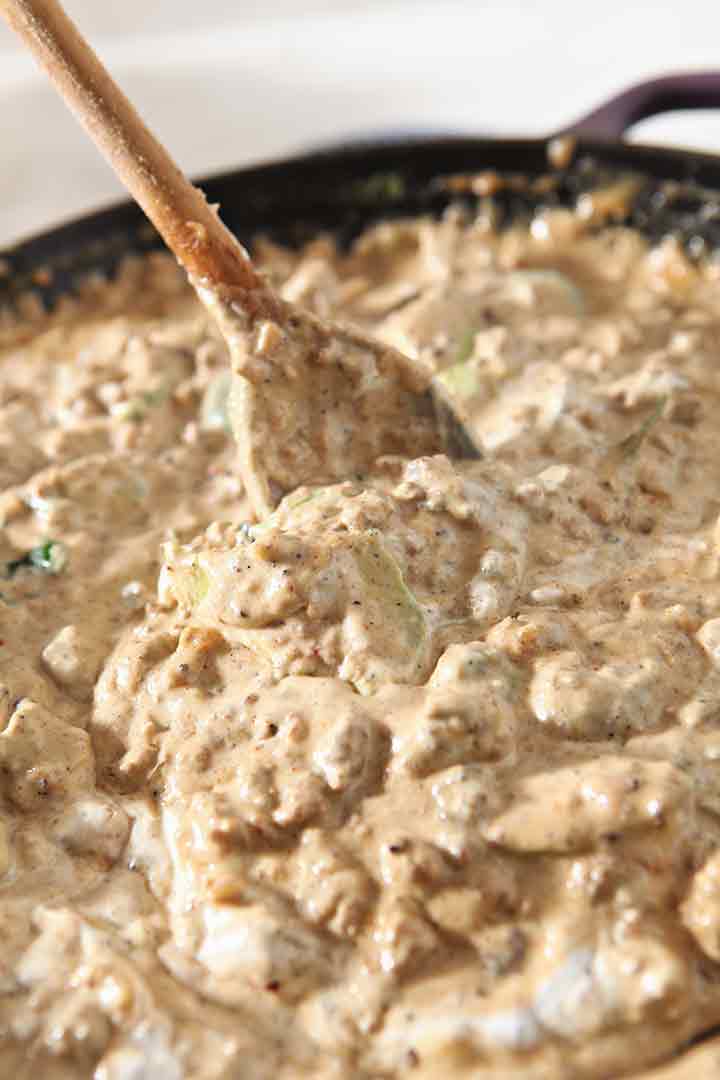
Next, add the beef to the queso, and stir it all together. I like to let mine bubble for a bit so the beef warms back up, too, but if you’re impatient, you can serve it immediately.
Remove the skillet from the heat. You can leave the queso in your skillet, as I have, or transfer it to a serving bowl or a slow cooker, to keep it warm.
No matter where you serve it, be sure to garnish the with sliced avocado, sour cream, jalapeño slices and parsley or cilantro — after all, these toppings make it LOADED queso.
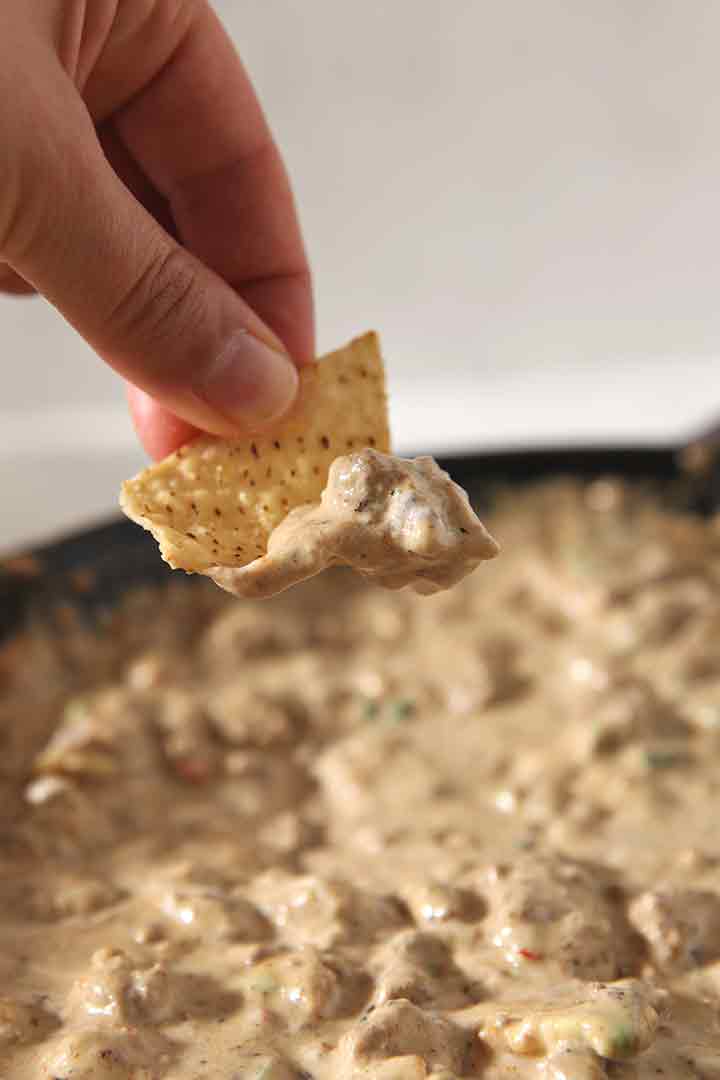
Serve immediately with your favorite tortilla chips, and enjoy.
How to store:
Store leftovers in an airtight container in the refrigerator for 3-4 days. Reheat in 30-second bursts in the microwave until warmed through.
Erin’s Easy Entertaining Tips
Make it in advance! If you’re making it the same day and hosting people at your house, keep it warm in the Instant Pot or the slow cooker. I did this for a weekday happy hour with some girlfriends and was pleasantly surprised that the queso stayed the perfect dipping consistency 5+ hours after I made it!
Bring this queso on the road. Simply transfer it to a container that can hold hot liquid (like a slow cooker or a really big glass storage container), and reheat when you arrive. Depending on how much it has cooled, you might have to add a little milk to it as you reheat it in the microwave.
Make parts of this dip in advance, too, if you want yours to be hot off the stovetop. Cook the veggies and brown the meat in advance, and store them in a food storage container in the refrigerator. Shred the cheeses in advance, too, so the only thing you have to do is melt all the cheeses and add the previously cooked beef mixture.
If following this method, I’d let the queso bubble for a little longer so the beef mixture comes up to temperature before serving.
Keep it warm. This recipe will stay warm in the slow cooker or Crock Pot on the lowest setting after you put it together on the stovetop. Prepare to add a little more milk before serving because it will slowly thicken.
Frequently Asked Questions
Because it has all the things, including ground beef, onion, jalapeño, multiple cheeses and lots of garnishes, too.
No. Pre-shredded cheese are coated in additives to keep them from clumping and molding, and sometimes, these additives interfere with them melting like they should. Because of this, I recommend purchasing blocks of cheese and shredding them at home. It takes 5-10 minutes tops, and ensures your queso has the most decadent creamy texture.
Quick tips for making Loaded Queso
- If you don’t like things spicy, leave out the jalapeño peppers and swap a mild cheese, like a mozzarella, for the hot pepper jack cheese.
- How to store: Store the queso a food safe storage container in the refrigerator for up to a week!
- Can’t find white cheddar? Use sharp orange cheddar instead.
- If you don’t like cilantro, try garnishing with parsley or green onions instead. (That’s what I do!)
Here’s how you can make it in your kitchen…
Homemade Loaded Queso
EQUIPMENT
As an Amazon Associate and member of other affiliate programs, I earn from qualifying purchases.
Ingredients
Queso
- 2 teaspoons avocado oil or another unflavored oil
- 1 small yellow onion (about ¾ cup diced)
- ½ jalapeño pepper diced
- 1 lb. ground beef (I used 85/15)
- 1 ½ teaspoon taco seasoning divided
- ½ teaspoon kosher salt
- ¼ teaspoon black pepper
- 1 ½ cup milk 2% works great
- 4 oz. cream cheese
- 1 ½ cups white cheddar shredded
- ½ cup hot pepper jack cheese shredded
Garnishes
- 1 avocado sliced
- ¼ cup sour cream
- Chopped parsley or cilantro
Want to save this?
Instructions
Prep the Ingredients
- Using a sharp knife, dice the onion and jalapeño pepper. Transfer them in a bowl together, and set aside.
- Shred the white cheddar cheese and the hot pepper jack cheese. Transfer them to a bowl, and set aside.
- Measure out the milk into a liquid measuring cup, and set aside.
Brown the Meat
- In a cast iron skillet over medium-high heat, pour in the oil.
- When the oil is hot, add the diced onion and jalapeño pepper.
- Using a wooden spoon, move the onion and jalapeño around the pan, cooking until they’ve softened and browned just slightly. (About 5-8 minutes, depending on how hot your stovetop runs.)
- Add the ground beef. Season with 1 teaspoon of taco seasoning, as well as the salt and pepper.
- Break the beef up with a wooden spoon, and let cook until browned.
- Once the meat has been browned, transfer it from the skillet to a large bowl, and set aside.
Make the Queso
- In the same skillet, turn down the heat to medium-low.
- Add the milk and the cream cheese, giving both time to warm up and the cream cheese begins melting. (About 10-15 minutes, depending on your stovetop and how warm the ingredients were before adding to the skillet.)
- Once the cream cheese is melting, add the other cheeses and the remaining ½ teaspoon of taco seasoning.
- Stir until the cheeses have completely melted together.
- Add the beef mixture back to the pan, stirring the ingredients all together, and let bubble for a few minutes.
- Remove from the heat and garnish with fresh avocado, sour cream, jalapeño slices and parsley or cilantro.
- Serve immediately, and enjoy!
Video
Notes
- Don’t like things spicy? Leave out the jalapeño peppers
and swap a mild cheese, like a mozzarella, for the hot pepper jack cheese. - Can’t find white cheddar? Use sharp orange cheddar instead.
- Not a fan of cilantro? Use parsley instead.
Nutrition

About the Author:
Erin Parker is a Southern gal living in Texas with her husband and two daughters. She started The Speckled Palate to share what she was cooking as a newlywed… and over the years, it’s evolved to capture her love for hosting. Specifically, the EASIEST, lowest key entertaining because everyone deserves to see their people and connect over good food. Learn more about her…


This is my favorite dip of all time! If I could put on a snorkel mask and swim in it I would!